The first dish is going cold while you wait for the rest. Once everything arrives, there is barely room for the plates—let alone a good photo. What you wanted was simple: you at the table, with the whole meal in front of you. Photograph each dish as it arrives, ask a friend for one seated portrait, and enjoy dinner. You can compose the picture afterwards.
Put yourself in the picture, too
The goal is a relaxed meal portrait: a person seated behind the table, dishes leading from the foreground towards them, and both face and food easy to see.
A table feels full because of how it is framed. Place larger plates near the camera, smaller bowls between them, and dessert farther back. Vary the spacing and depth without overlapping plates unnaturally. Use the food you photographed; abundance should not come from inventing dishes or enlarging portions.
Sparkles Editor can help check your references before turning the plan into an image. Generation redraws faces and food details, so keep the original photographs when you need an accurate record of what the restaurant served.
1. A seated portrait, then a photo of each dish
The person: Ask a friend across the table for a relaxed waist-up photo. Keep your face, hair and shoulders visible, with a little table in frame. Let your hands rest naturally. Use your own photograph or one you have permission to use.
The food: Photograph each dish before eating, including the plate rim. Keep a similar downward angle and light direction. Mixing overhead photographs with low, table-level shots asks the model to invent more unseen detail.
Six dishes, six files: A turn currently allows up to 6 attachments, at most 5 MB each and 8 MB combined; a generation can select up to 6 reference images. One workable set is one portrait, four individual dish photos and one photo showing two clearly separated dishes. List those final two dishes separately. Or begin with fewer dishes. Export smaller copies if necessary; uploading in several turns does not remove the generation reference limit.
Your portrait may already provide a useful view of the table and setting. If another person's restaurant post inspires you, describe its composition without bringing their face, venue name or branding into your image.
2. Tell the assistant who belongs in the scene
Upload your material in Creative assistant, then try this message. Adjust the image numbers to match your files:
I want a natural meal portrait: me seated behind the table with this meal spread out in front. Do not generate yet.
Image 1 is a portrait I have permission to use. Use it for the person's appearance, hair, clothing and any visible table setting.
Images 2–5 each show one dish. Image 6 shows two dishes; list those separately. Count food from the dish references only, so anything already visible in the portrait is not counted twice.
In order, describe each dish's visible appearance, plate shape and color, visible count, portion and camera angle. Ask about uncertainty instead of guessing ingredients.
Check the total and any duplicates, then suggest a composition with the person behind the table and dishes across the foreground. If the key details are clear, do not ask for repeated confirmations.
Correct the inventory before continuing. If dessert was mistaken for a side dish or the same plate was counted twice, fix that now. Then say “Generate one image using this plan.”
3. Give the person, food and camera a place
For a tall restaurant portrait, start with 2:3. You can later try a supported 4:5 size for a more compact social image. Replace the bracketed part with your own inventory:
Generate one natural restaurant photograph from the checked references, with a person and the whole meal together. Use a 2:3 portrait composition.

Person: use the authorized subject in image 1. Preserve their facial features, hairstyle, clothing and natural skin texture as closely as possible; do not automatically reshape their face or replace their identity. Seat them behind the table, face towards the upper part of the frame, with shoulders and some upper body visible. Relaxed expression and natural hands, without a forced spoon-to-mouth pose.

Food: use only this checked inventory: [list every dish and its plate]. Each dish appears once. Preserve the original portions, plate shapes and colors, and visible food counts as closely as possible. Add no new dishes, drinks or decorative ingredients.

Composition: photograph from the opposite seat at a gentle downward angle, not overhead. The tabletop occupies roughly the lower half to two-thirds. Larger plates sit near the camera, smaller bowls and sides between them, dessert nearer the person. Keep plate rims in frame and a little table between dishes. Food must not hide the face, and arms must not intersect plates.

Light and setting: follow the table and window-light direction in the portrait. Match the person and food's white balance, with believable contact shadows under plates. A relaxed, generous meal photographed by a friend, with natural skin and food texture and a quiet background.

Avoid extreme wide-angle distortion, a tiny head or oversized foreground plates; invented food, larger portions or duplicate dishes; airbrushed skin, plastic food, logos, venue names and watermarks.
If your plan is already clear, use Create images, add the references, select an image model and keep the creative direction on Freeform. Start with one result. Conversation, image analysis and generation consume Credits by usage; another generation is another call.
4. An original example: one person and six dishes
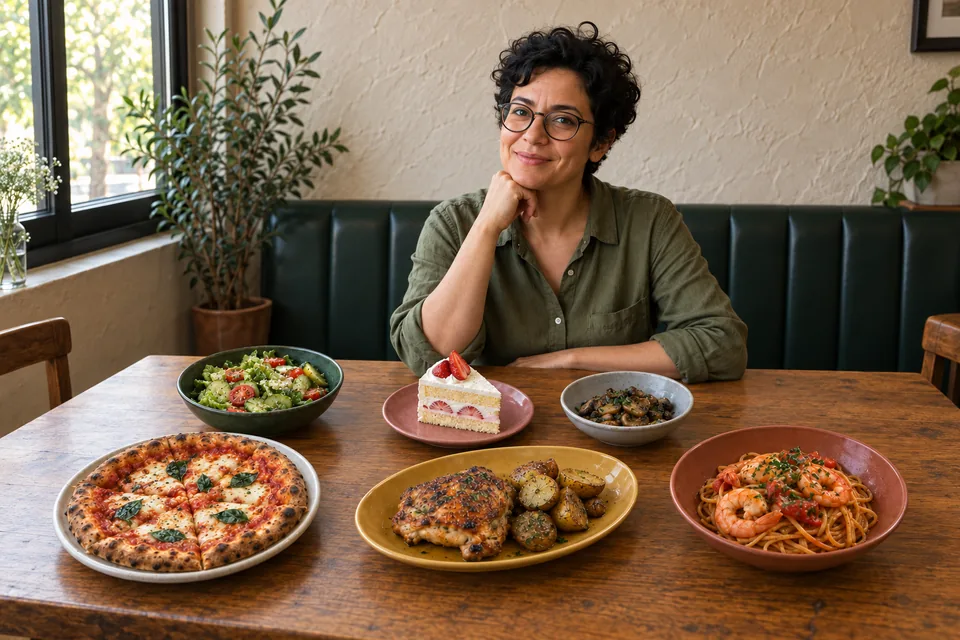
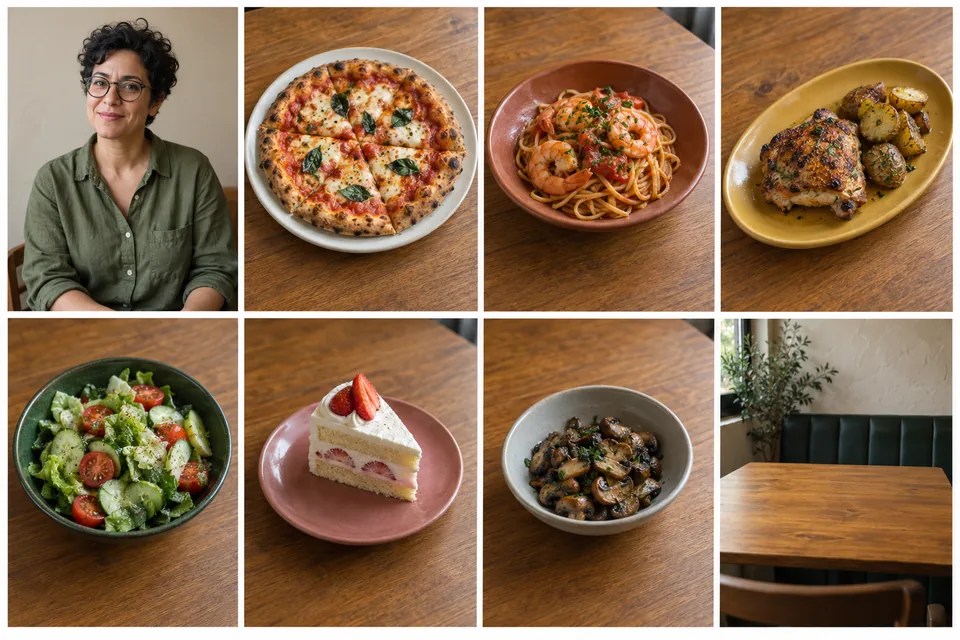
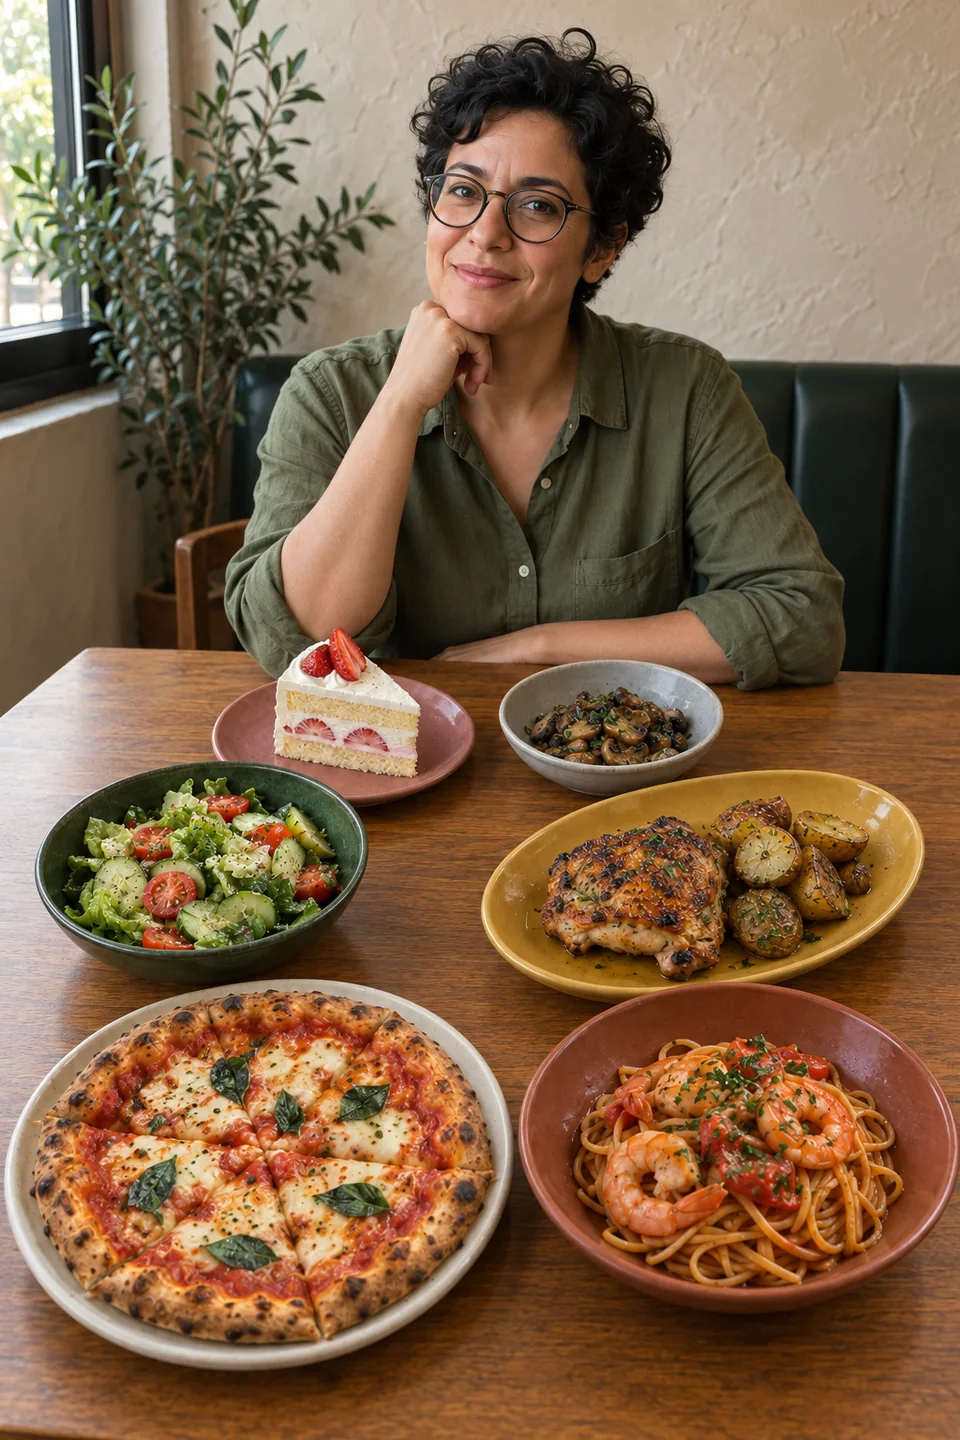
We first generated an original reference board: a fictional adult with short curly hair, round glasses and an olive-green shirt, six dishes, and a window-lit cafe setting. We used that board as the reference for the portrait below, then recomposed the result as a landscape cover.
The inventory is a pizza on an ivory plate, prawn pasta in a terracotta bowl, chicken and potatoes on a yellow plate, salad in a green bowl, strawberry cake on a pink plate, and mushrooms in a gray bowl. All six separate dishes are visible in both the portrait and landscape results.
These are original AI illustrations made separately for this tutorial, not restaurant photographs, customer results or a benchmark of a particular model on the site. The board is one reference file: its eight panels do not mean eight separate attachments are supported. People, tableware and food details are redrawn, so this is not lossless compositing.
5. Check the person as carefully as the food
Compare the result with your references:
| Check | Watch for | Ask for |
|---|---|---|
| Person | A different face, changed hair, odd fingers or glasses | Restore image 1's features and clothing as closely as possible; correct the hands |
| Food | Missing or repeated dishes; one cake slice becoming two | The exact dish and quantity from your checklist |
| Scale and placement | A tiny person, huge foreground plates or intersecting dishes | Move the camera back, bring the person closer to the table, restore believable scale |
| Light and texture | Different light on face and food, or floating plates | Consistent window light, white balance and contact shadows |
For a small correction, use Edit a region to mark the problem: “Fix only the distorted bowl rim at bottom right; keep the person and other food as close as possible.” Review again afterwards. A local edit does not guarantee every surrounding pixel stays unchanged.
6. One atmospheric portrait, a few honest details
Share the original dish photos as well. Open with the composed meal portrait, then show the real food photographs. The first gives a sense of the occasion; the rest preserve the actual portions and details.
Recompose for a second format. A portrait gives the table more depth. A landscape can work well as a blog cover:
Keep the person, clothing and these six dishes from the previous result, and recompose as a 3:2 landscape image. Move the camera back, seat the person slightly right of center behind the table, and spread the six dishes naturally across it. Do not crop away the head or foreground plates, and do not stretch the portrait. Generate one image first.
Add your own story. Ask for a little quiet background space, then add a real date or a short personal note yourself. Venue names, prices and dining opinions should come from you, not the model.
A starter message is filled in for you to edit and send. Chat is billed by usage; clear image requests generate directly and use Credits.